User Guide

Coming Soon!

Learn how to download, use, or troubleshoot VotingApp.
Learn how to download, use, or troubleshoot VotingApp with the user guide below.  If you are looking for help with a particular issue or error, please view our Help Page.
The Mobile Application of VotingApp is the end user voter facing application used for authenticating voters into the system, retrieving their assigned ballot style, allowing that voter to mark their ballot and review their selections, and finally submit their marked ballot or Cast Vote Record to the Ledger (blockchain based component used to store all ballot data, voter authentication credentials and submitted marked ballots) along with their Voter Receipt. This application is housed in the Google Play Store and Apple App Store to be downloaded onto the user’s devices by end users prior to use. This document will cover the installation of the application and typical user workflows from each page of the application. The document will follow the iOS version for screen shots which may vary slightly from the Android version, but all functionality between the two platforms is equivalent. 

2.1 Finding the Application

The Mobile Application can be found on both the Google Play Store and the Apple App Store by searching for Vidaloop VotingApp. The icon will look like the one posted below:

2.2 Installing the Application

The application must be installed to a mobile device for voting to begin. Follow the instructions for each platform listed below as needed. 

2.2.1 Installing on iOS

  1. Open the App Store application on mobile device
  2. Click the Search button and Open Search bar
  3. Enter ‘Vidaloop VotingApp’
  4. On the VotingApp page click the cloud shape download icon
  5. Once downloaded, click the Open button

2.2.2 Installing on Android

  1. In the Play Store find VotingApp by Vidaloop
  2. Click the Green Install button.

    If you do not see a green install button on the VotingApp page Click on the About this app section, scroll to the bottom of the section and look for the item listed as ‘Compatibility’. Verify that ‘Works on your device’ is displayed. If not you may need to find a device that matches or exceeds the Required OS requirements listed below Version number. 
  3. When the Install is complete you will see a Green Open button. Click to begin voting. 

    Alternatively you will also now have the VotingApp icon installed on your home screen and in your application list. You can open the application from this icon at any time. 
Here you will find descriptions and steps to use on each page of the application as well as general information about the navigation and menus available within the application. 

3.1 Starting up the Mobile App

Upon successful installation a VotingApp icon should appear on your device applications list. Click the icon to open.
A series of automated checks will be run with success or failure indicators visible on the screen. These are various security and device integrity checks. If any fail, a link to a webpage for possible solutions to the problem will appear.

This step may take a minute or two to complete. Do not close the app while this is running or you will need to rerun the checks upon application reopen.

If the device security check passes, you will see the second image below.

If the device security checks fails,  you will see the third image below with help desk options.

3.2 New User Onboarding

The first time you use the VotingApp mobile application you will be prompted to follow an onboarding workflow that will help you set up the application to your particular needs with regard to in-app accessibility settings. This workflow can be skipped resulting in all default settings. These can always be changed by accessing the menus from the menu bar as described in Section 4.1 The Menu Bar.

A first time user to the app will be presented with a Welcome Screen with information across three views about setting up their device for use with VotingApp

Press the "Setup My Account" button to continue
If your device is not currently using a lock screen method, the application will prompt you to set up a lock screen method for your device. Follow the prompt through the redirect to your phone settings and enable at least one lock screen method.

If your device already has a lock screen method in use, the user will be prompted to enter that information now.

If entered successfully, the user will be directed to the Scan Token Screen (See 3.3 Getting Your Ballot).

If entered unsuccessfully, the user will be prompted to try again

*This step helps ensure that the owner of the phone is also the user of the application. It provides added security to the ballot in the event that the user leaves the device unattended during voting. It also helps secure the ballot during multisession usage. The information used in this step stays on the device and is never transmitted off-device. Therefore, feel free to use any lock screen method available including but not limited to passwords, pins, patterns or biometrics.
If this is the first time using VotingApp, a prompt to create custom settings will appear. You can follow these now or return to adjust them at anytime during the voting process by accessing them in the Settings Menu. (See Section 4.0 Accessibility and Language Settings)

Press the "Get Started" button to begin.

New users are presented with the option to change

Accessibility Settings;
Language Settings;
and Ballot Audio Setting

The user can change and review these settings by clicking the appropriate link or they can move to the next group of settings by pressing the large red button at the bottom of each screen.

When all settings are applied, the on-boarding process is complete and you will be directed to the Mobile Application Homepage (See Section 3.3 Getting Your Ballot)

3.3 Getting Your Ballot

Once the security checks and onboarding are complete, every subsequent return to VotingApp will open  to the Homepage.. The Homepage is where the voting process will begin for all new elections, and end with the ballot receipt once the voting process is complete. The first time you arrive at the Homepage you will be prompted to start a new election.

There are no actions available on this page except to Start a New Election. Click the large tile to vote for the first time.

*Note: At the top left of the menu bar is a persistent set of menu options present from this point forward on every page. (See Section 4.0 Accessibility and Language Settings Adjusting Settings or Section 5.0 General Navigation Tips for more information on the menu bar and associated icons)
Returning voters will see a Homepage with all ‘active’ elections and a button to view past elections for which ballots were delivered to the voter’s device

*Voting on VotingApp can be a multi-session activity, meaning once you receive your ballot you can open and close the application as many times as you want during the live voting period and all progress is retained. Therefore, an “active election” refers to an election for which you have received your ballot and the voting period is still open. If a voting period has closed, that election will be moved  into the Summary section. New elections would be activated by using the Start a New Election button.
After clicking Start a New Election, the app will prompt you to scan the token provided to you by your election jurisdiction. You may need to grant camera permissions to the application if prompted by your device. Click "Continue to Camera Access" to begin scanning.

Using the camera, scan your QR code token. This token contains information that lets the application know what specific election you are trying to access and a bit of random information unique to each voter. No personally identifiable information about the voter is stored in this token.

*Each token is unique to each election and to each voter within any given election. If you lose your token you must contact your election’s office to get another reissued. This may require some processing time. Once scanned you will not need to retain this token unless you need to access the election from a new device later. Each new device used will need to scan the token to begin.
There are some instances where the QR code scan will be unsuccessful. These can range from an expired token (election is no longer active); voter registration status is set to inactive for use with VotingApp; or internet connection was interrupted during scanning/processing.

If this occurs try again and if the problem persists use the Help Desk options available to troubleshoot the error.
If the token scanning is successful you will be directed to the Confirm Your Identity page. Here you will be prompted to enter some information related to your voter registration record that uniquely identifies you as a voter.

Once all fields are complete click the "View My Ballot" button

If the entered information does not match expected results a failure will occur. You can try again or contact your election office if you believe there is a problem.

If the information does match the expected values the system will then retrieve the ballot. During this processing time you will see a waiting screen pictured below.

If credentials are successfully accepted the ballot will be delivered to your device and Confirming Your Identity process will be complete. The next steps involve exploring the ballot views and marking features.

3.4 Using Your Ballot

Voting with VotingApp Mobile Application is very similar to voting with other electronic devices in poll stations but with the freedom to fill out your ballot over time, and from the comfort of any location. Some of the features you may be familiar with like audio ballots, contrast setting changes, text size settings changes, etc. are available in VotingApp as well. But there are several additional features available in the application that provide a superior voting experience to more traditional systems. The next section will review these features and provide explanations for how and why to use each.

3.4.1 Your Ballot Receipt

One of the improvements VotingApp provides over traditional voting systems is your ability to track your ballot from the moment you create your selections, to the secure storing of your ballot, to the processing and counting of your vote by your Election Office. This tracking is referred to as end-to-end-voter-verifiability (E2EVV).

A unique feature of VotingApp is its ability to offer E2EVV without compromising the secrecy of your ballot or compromising your identity even to election officials. This is accomplished through well-vetted cryptographic techniques described in greater detail on VotingApp.com but also through a Voter Receipt provided to you upon submission of your marked ballot. 

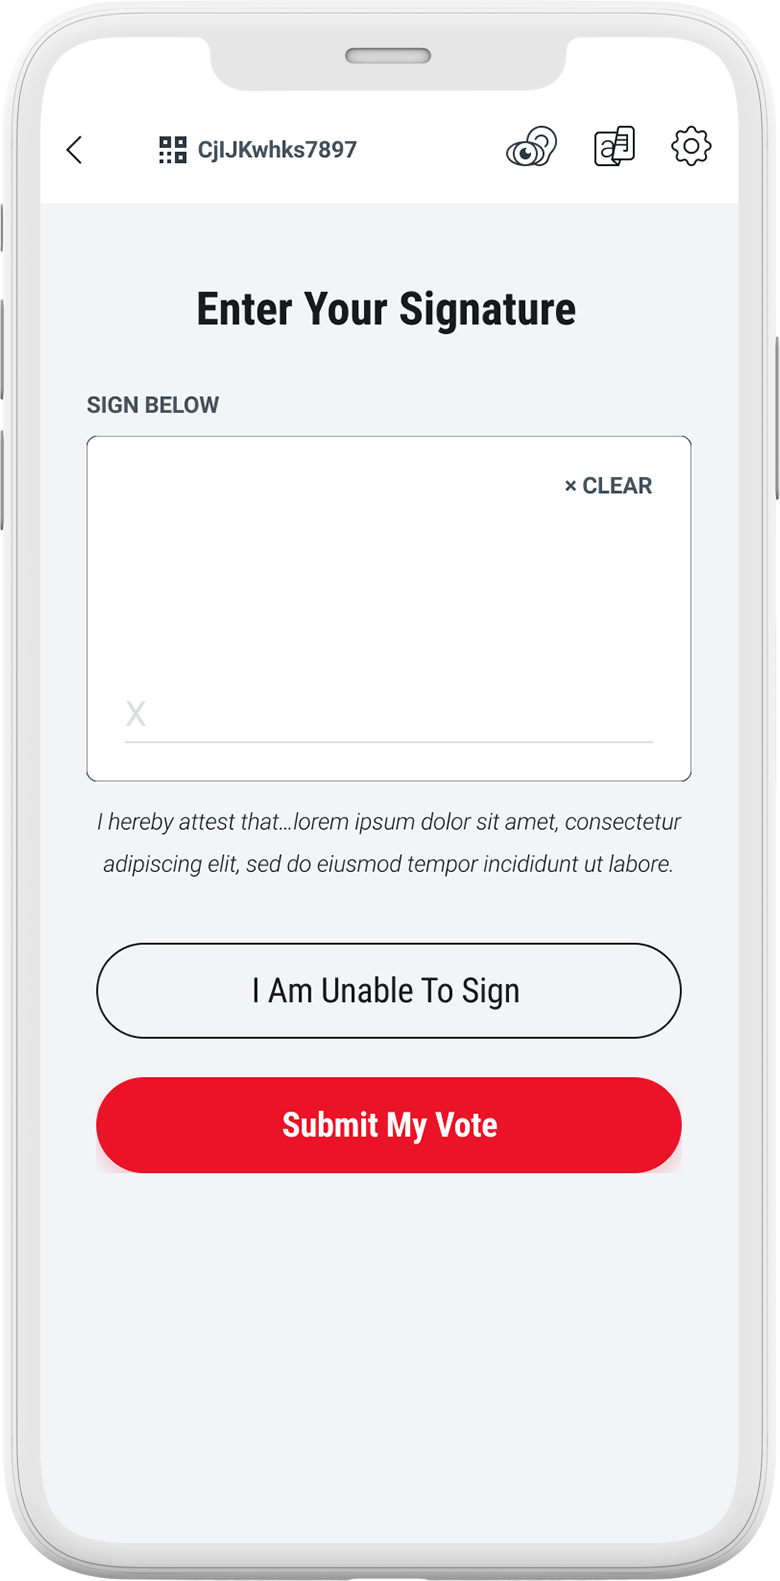
The short description of the receipt is that it is a cryptographic representation of your selections, plus a piece of data randomly generated or created by you, called the Voter Code, such that only you could determine this code before the submission of your vote. This unique receipt is kept by you, and a copy is stored in the Ledger with your encrypted vote but with no direct tie to your identity. After the election closes your Election Office will unencrypt your vote and recreate another copy of the receipt with those selections. 

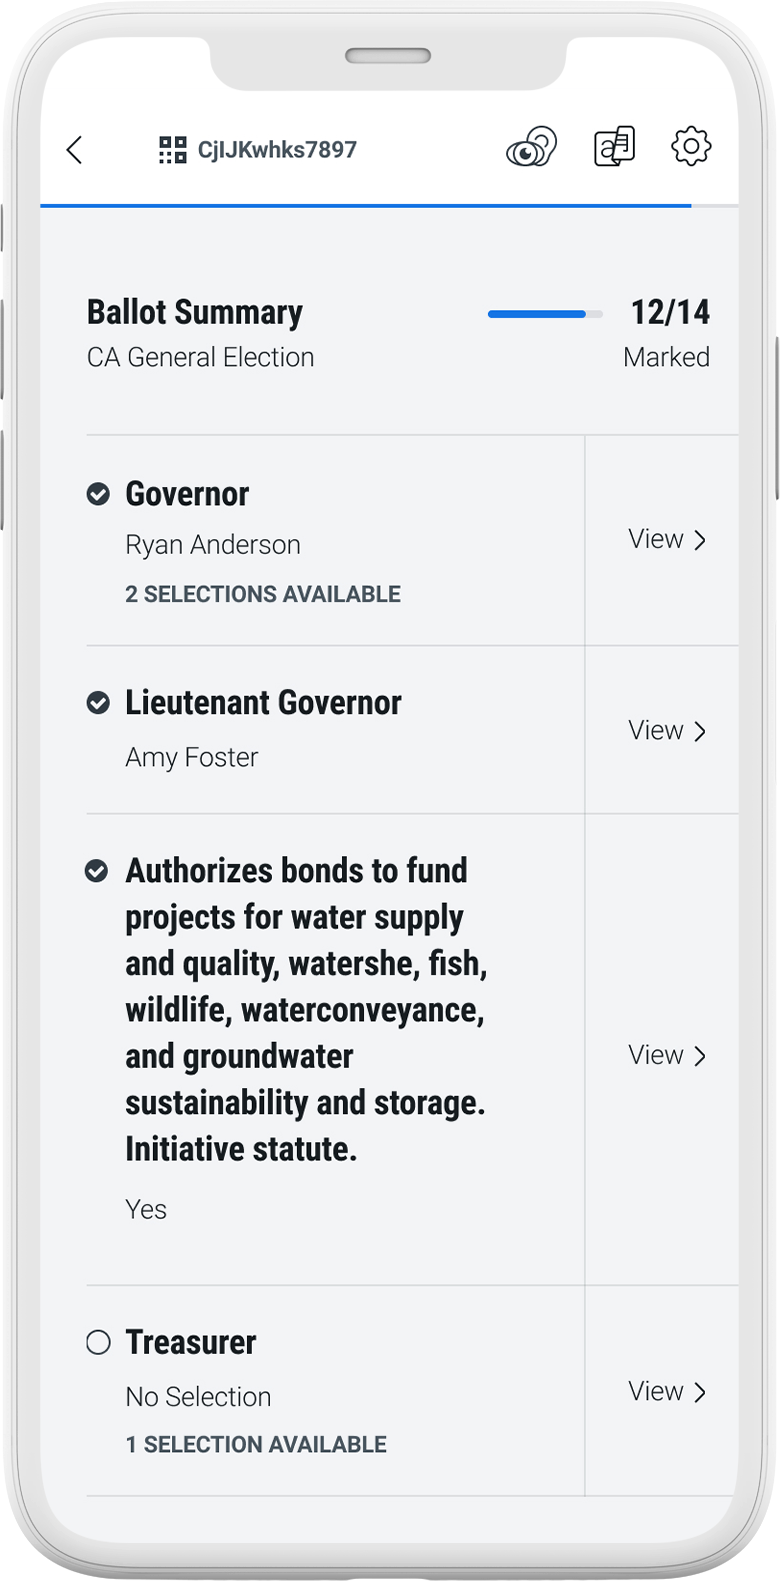
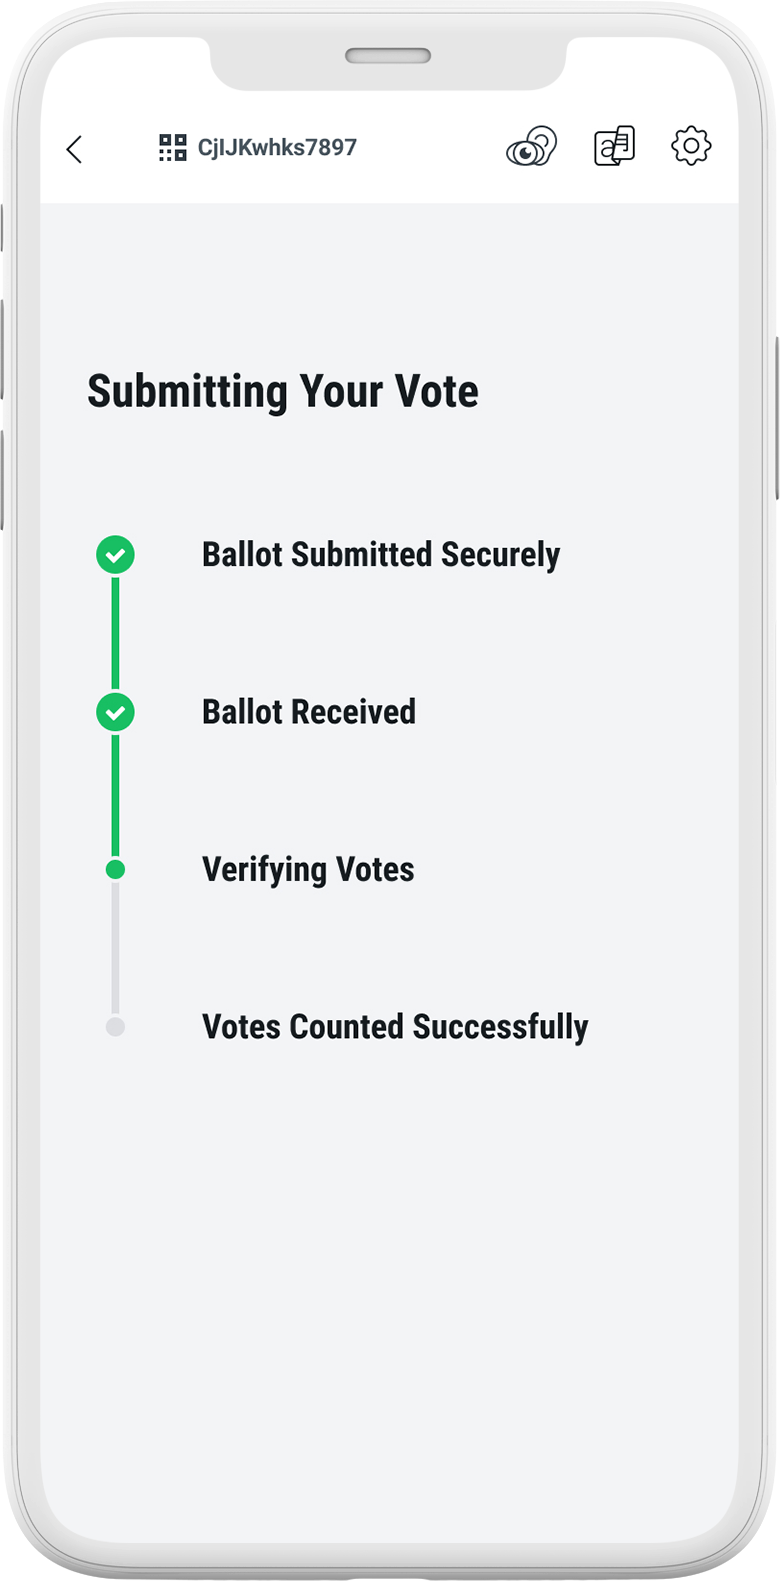
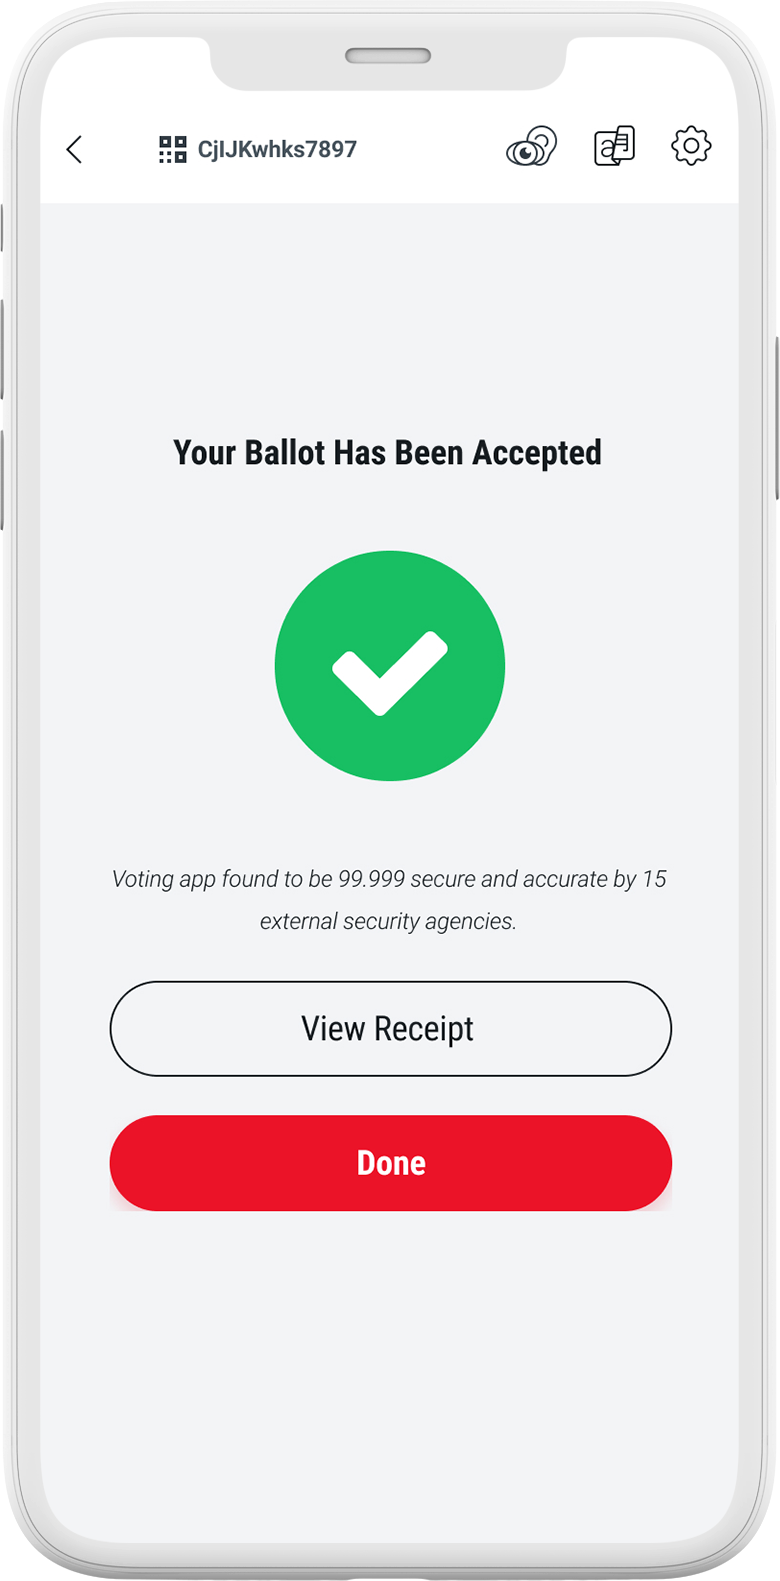
If the receipt you retain matches the receipt stored in the Ledger and then subsequently also matches the receipt recreated after live voting closes, you can be assured no changes were made to your ballot in any step as each receipt is the unique combination of selections and the information you provided. As part of your receipt there is a QR code provided that allows you to view into the Ledger at any time and see the stored copy of the receipt to compare against your receipt copy, as well as a status of your vote. Once all receipts are matched as described above, the status will change from PENDING to ACCEPTED to indicate that the jurisdiction has received and processed your vote.

More information on this process can be found on VotingApp.com where detailed information is available.
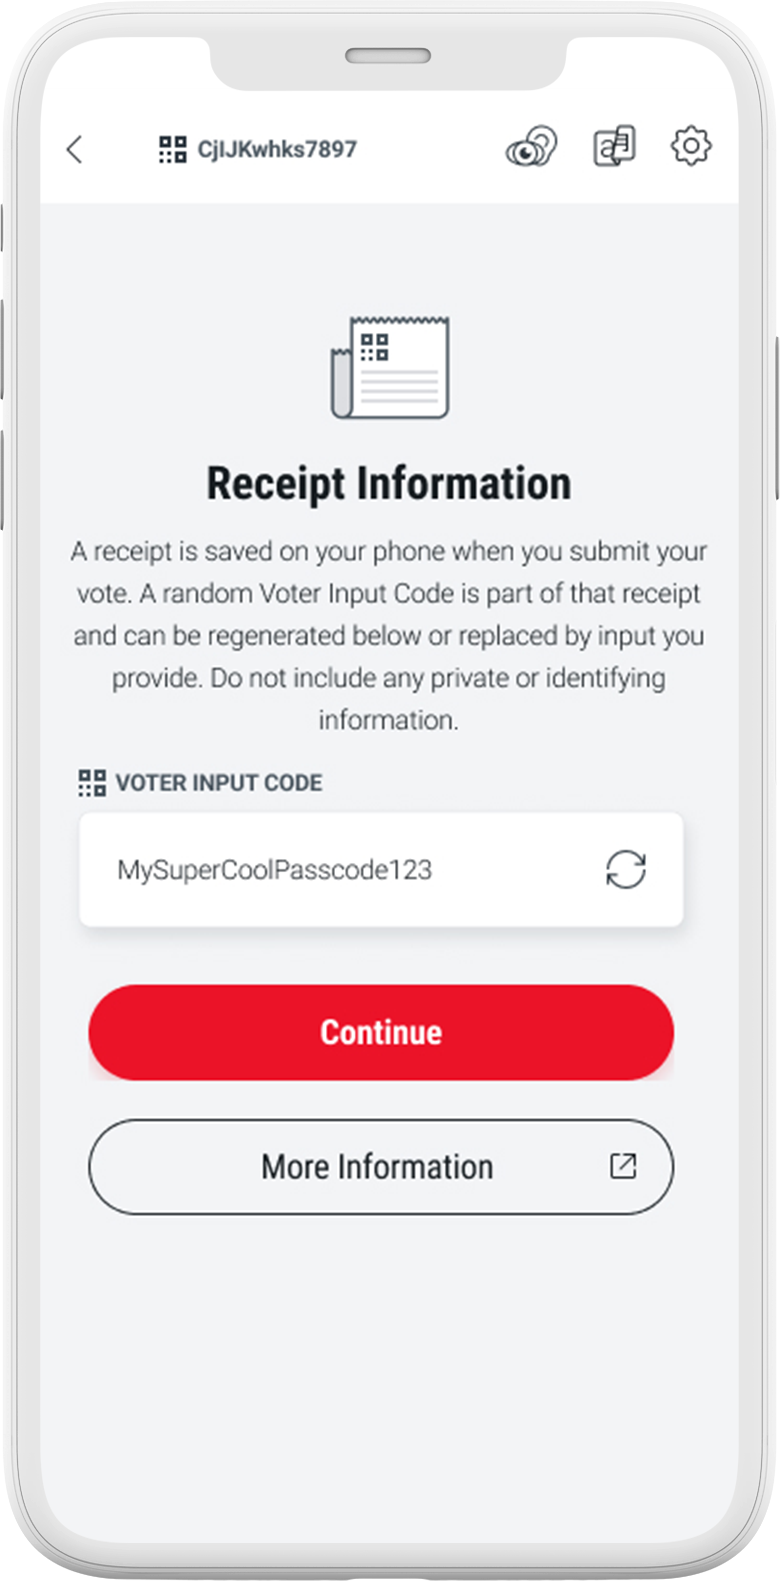
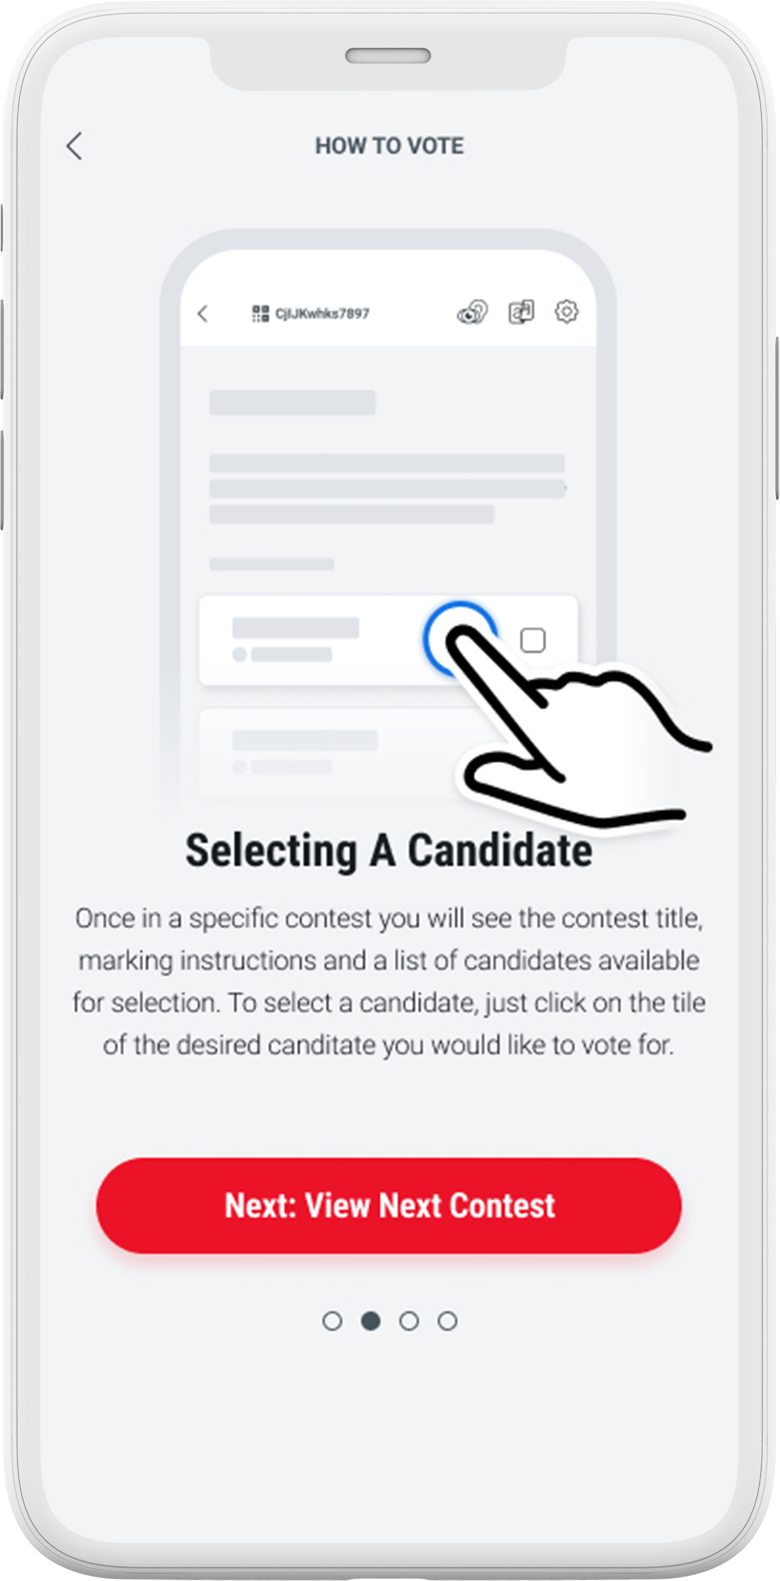
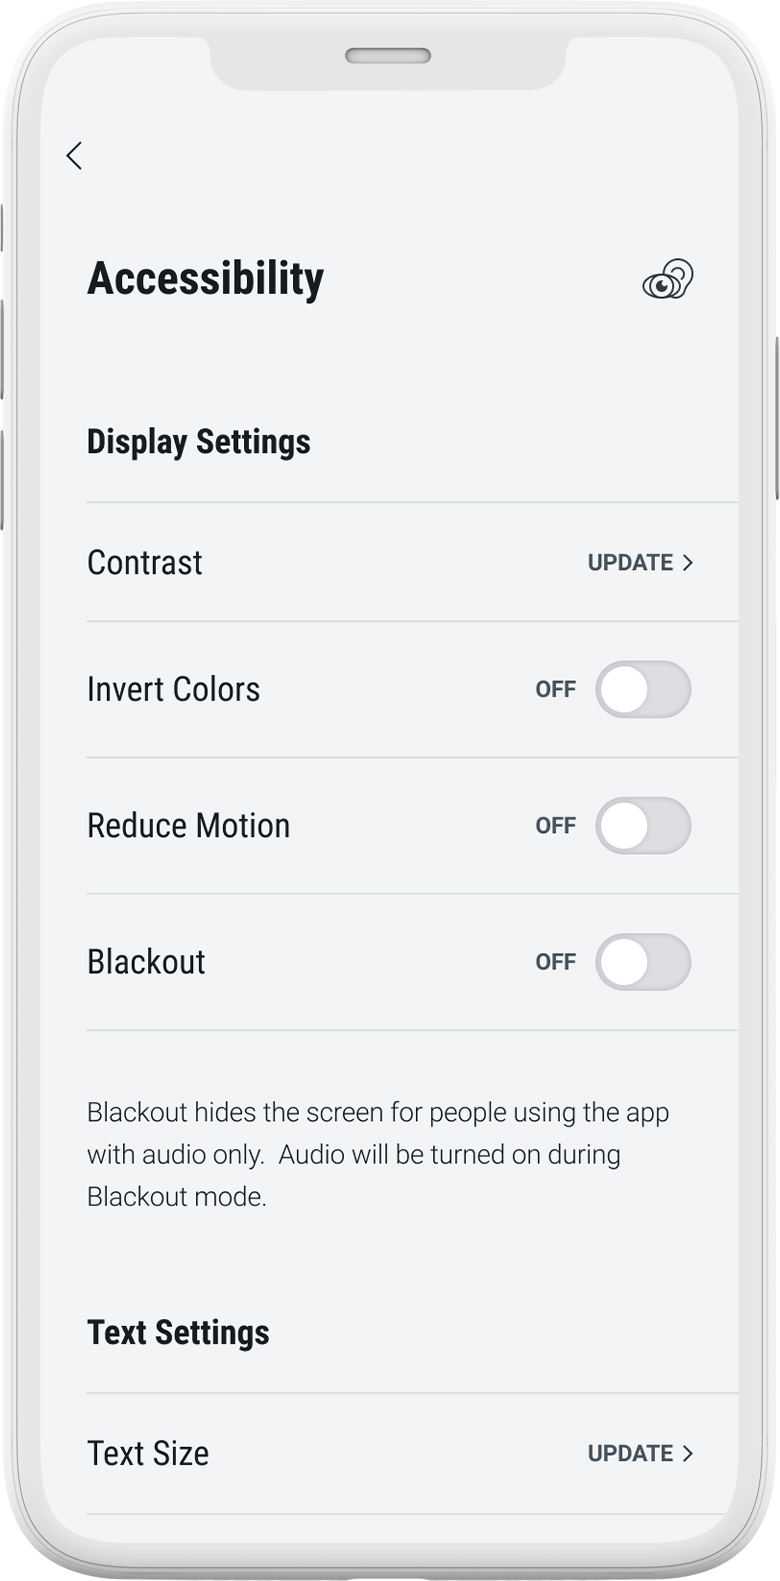
  1. Before you begin voting you will be directed to your Receipt Information page, which can be accessed at any time.
  2. Here you can customize the Voter Input Code using the provided input field. To continue to your ballot, click the "Continue" button
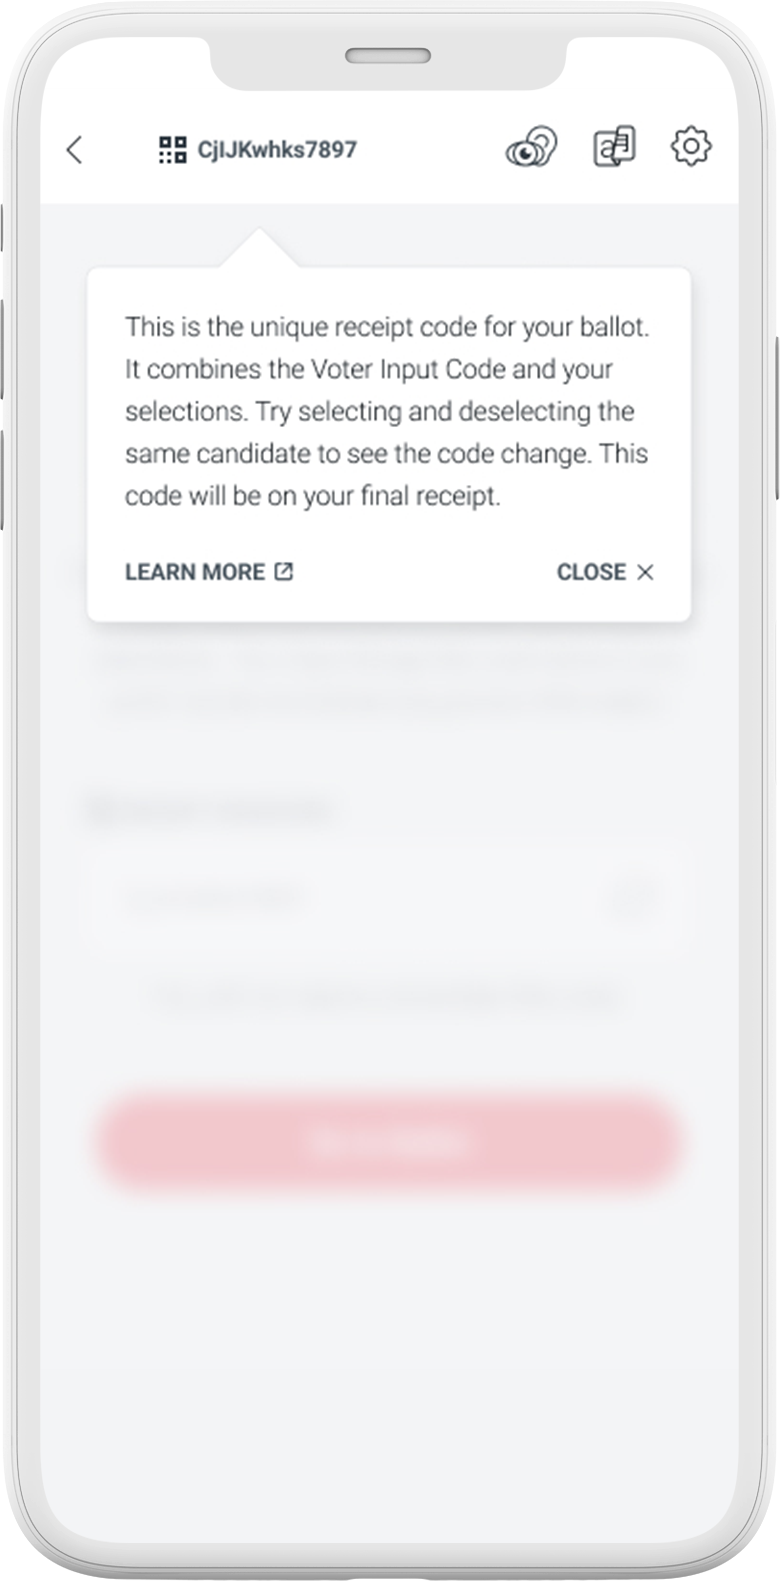
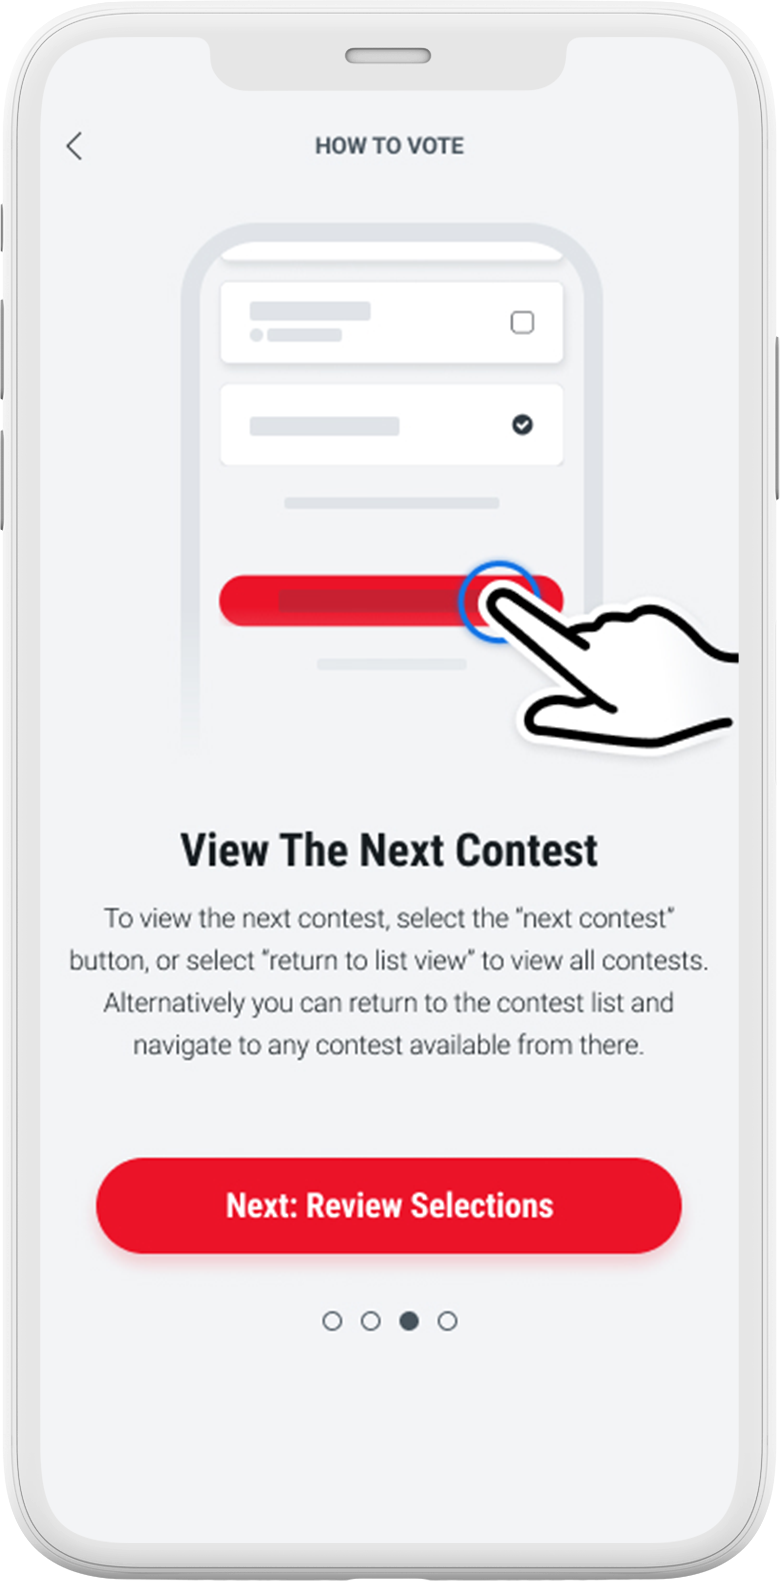
  3. A Receipt Code is displayed at the top of the screen. This is a combination of the Voter Input Code and selections made throughout the process.

3.4.2 VotingApp Ballot Marking Tutorial

Similar to the initial onboarding screens there are a series of first time user screens designed to help guide you through navigating and marking your first ballot. You can follow this on-screen tutorial or skip it. You can always return to the tutorial from the Help Menu at any time. Let’s review the tutorial screens now.

The marking tutorial can be accessed with the "Show Me How to Vote" button or skipped with the "Go Directly to My Ballot" button.

When you are done with the tutorial press the "Go To My Ballot" button

3.4.3 Voting

You’ve completed all the pre-voting activities. You are finally ready to start making official selections to your ballot. The first screen you will see is a ‘Ballot Instructions’ page which has written directions that are specific to your ballot, as well as information on available languages to view the ballot, how to navigate the help/menu settings, and general navigation tips.

Read over your instructions if you want and press the "View My Ballot" button when you are ready to proceed.

*This page often extends past a single view. You can scroll to the button at the bottom of the page by using the touchscreen swiping capability of your device or using the Scroll More and associated direction buttons at the bottom of the screen.
The first ballot page you will see is a Contest List. This page shows all available contests on your ballot and groups them by category.

To the right of each section header is a progress bar. This will indicate how many contests you have made at least one selection in and how many in that section still have not been voted on.

This page will also often extend past a single view and, similar to the instructions page, you can swipe down to see more content or use the scrolling arrows at the bottom of the page to navigate within the page.

Alternatively you can use connected navigation devices such as button devices or keyboards and navigate by scrolling through individual elements. (See Section 4.0 Accessibility and Language Settings and Section 5.0 General Navigation Tips for more information)

To navigate to an individual contest you can click anywhere on the tile with the title of the contest you want to visit (indicated by the red highlighted box below)
  1. Selections are made by pressing the tile with the candidate you wish to select. To deselect press the same tile again.
  2. Pressing the Write-In tile opens a window with a keyboard to enter a custom candidate name. You can save the entry or cancel with each button here.
  3. If you save a Write-In candidate in the previous step, the candidate tile will now display your custom entry in the tile name and description. You can edit or deselect here now.
  4. Some contests allow for more than one selection. This is indicated by the Vote For text directly above the candidate tiles. Select up to as many as the text indicates.
  5. If you reach the maximum selections and try to select another candidate, an overvote warning will appear. If you want to select that new candidate, deselect the prior candidate first.

3.4.4 Reviewing Your Ballot

At the bottom of the Contest List Page and at the bottom of the last contest available there is a "Review Ballot" button. Press this at anytime to review your selections.

The Ballot Summary Page is located past all the contest pages. It is similar to the Contest List page with a list of contests in order and a progress indicator. It also contains the actual selections you made for each contest with warnings to indicate where you have selections remaining.
  1. From the Ballot Summary page, click the View button to the right of any contest to return to individual contests and make changes.
  2. After you’ve made any desired changes, click the Return to Review button to navigate from the individual contest back to the Summary Page.
  3. When you are done voting press the Submit My Vote button on the Summary Page. If you have selections remaining, a warning will let you know. You may submit with missing selections.
  4. You can clear all ballot selections from this page by using the Clear All Selections link at the bottom of the page. Use this feature to clear a ballot and start over quickly.
  5. A warning will appear if you try to clear your selections. This action is irreversible so only confirm this action if you are sure you want to remove all selections you’ve made thus far to your ballot.

3.4.5 Submitting Your Vote

You have made all the selections you want on every contest available and you are ready to submit your marked ballot. There are several steps involved in this process which exist to ensure that you are the correct person submitting the vote. Because VotingApp allows you to vote overtime and across multiple sessions, the app will confirm the person who submits the vote is the same person who requested the ballot to begin with. Therefore, you will be asked to reconfirm your identity upon submission. The following steps detail this identity confirmation process.

Press the "Submit My Vote" button and then re-enter your credentials.
Your jurisdiction may require you to sign an affidavit upon vote submission. If you cannot sign for any reason and the option is available you can use the I Am Unable to Sign button. When you are done, click "Submit My Vote" button.

The system will now encrypt your vote and signature for transmission to the Ledger. A progress bar will indicate various system steps regarding this process. This shouldn’t take long but can take a couple minutes at most.
If your vote is successfully received and stored in the Ledger you will get a success message. From here you can leave the app OR view your receipt.

If the submission is unsuccessful for any reason you will be notified in the app at this time. You can try again or attempt to troubleshoot with the Help Desk information displayed on screen.
The ballot receipt discussed earlier (See Section 3.4.1 Your Ballot Receipt) is now available to you. This receipt has your Receipt Code and the Voter Input Code you either randomly generated or custom generated on your own. You can use the URL or the QR code to view your ballot on the Ledger.

Remember your ballot is encrypted while in storage on the Ledger, so you will not be able to view the contents or individual contest selections. This protects your secrecy but, don’t worry, your receipt associated with your encrypted ballot will match the receipt displayed on your device.If the two receipts do not match, contact your Election Office immediately.

At the end of the election, the Election Office will decrypt your vote and recreate the receipt. If the re-created receipt, stored receipt, and in-hand receipt all match, you can be guaranteed what you submitted is what was stored and, finally, what was counted. This will be indicated by a STATUS display in the Ledger Viewer. Pending status means the final receipt is not yet re-created. Accepted means all receipts match. Withdrawn means you were found to have voted in another method (by mail or in a poll station) and your digital vote has been disregarded in favor of the other method in order to prevent a duplicate voting scenario.
VotingApp Mobile Application has an unprecedented amount of accessibility and language settings. All your device settings such as TalkBack on Android devices and VoiceOver on iOS devices will work with the application, as will screen manipulation settings such as contrast, zooming, text size adjustment, and more. However, in addition to the device level settings the application itself has custom built-in settings highlighted in this section. 

For help with your device-specific settings, visit information regarding your specific device created by your device manufacturer. For application specific settings see below.

 4.1 The Menu Bar

The menu bar is persistent on every page of the application located at the top of every page. From this bar you can reach the following menu items.

A) The Back Button - returns to the previously visited page regardless of location in the application.

B) The Receipt Code - changes as you change your selections (See Section 3.4.1 Your Ballot Receipt for more information).

C) Accessibility Settings Menu - changes Font Size, Contrast, and other options.

D) Language Settings Menu - select from available languages for both displayed and audio languages. Mix and match between display and audio.

E) General Settings and Help Options - find a default list of all settings and help available
All of the Menu bar items are actionable with a short press on the screen, or by highlighting and selecting if using an assistive navigation device. (See Section 5.0 General Navigation Tips for more information)

4.2 Accessibility Settings

All of the built-in screen adjustment options are available in the Accessibility Settings menu. The basic menu will display Contrast and Font Size adjustments. Advanced options, if available, will contain items such as motion reduction options, screen blackout options when implemented with the audio options, etc..

Use the toggles on options available to adjust. Some options will have additional views with a preview to help you select the preferable ‘level’.

4.3 Language Settings

Language options are determined by the available languages provided by your Election Office for any given election. The application defaults to English but you can find all available languages within the Language Settings. Audio language support is also indicated within this menu.
  1. Language settings main menu has options for displayed languages (Preferred Language) and Ballot Audio Language
  2. You can see all languages provided by your Election Office from the list.
  3. While you can select a language before receiving your ballot, sometimes certain ballots are not available in the language you have selected initially. If this is the case, when you get your ballot a language warning may appear and prompt you to adjust your language settings.
  4. You can turn on your audio ballot with the toggle on the Language Settings page.
  5. By default the audio ballot will be in the same language as your display language. However, you can select a different language for audio from display if necessary.

4.4 General Settings and Help

At any point throughout the voting process, you can navigate back to the general Settings menu to find help content, tutorials and support contact information. Any customizable features you may have skipped over can be revisited here as well.

Revisit this menu before each new election as your Election Office may have changed which content is customizable.

5.1 Touchscreen navigation

The application is designed to work with the touch screen of your device. All standard swipe, pinching, and other supported touch screen actions will function as intended. There is no content that extends the screen left to right unless you turn on a device setting zoom feature. However, there is content that extends beyond a single screen. This will be indicated by the presence of a scroll bar menu at the bottom of any page that has additional content not visible in a single view. See below.
The text content indicates the type of content available below the view. This will change depending on the page you are viewing. If you see this menu bar you can use the arrows provided on the bar with a short press or you can swipe the screen up and down depending on which direction you want to see more content. 

All selections are made with the standard short-press on active elements of the application.

5.2 Using assistive plug in devices

VotingApp Mobile Application is designed to integrate with existing assistive technology hardware. If you use a button device, sip and puff, keyboard, refreshable braille device, or any other plug and play device that works with your mobile device, it will work as a navigation and/or entry device with VotingApp. Follow all setup steps that come with your third-party hardware device to integrate with your mobile application, then open VotingApp. Some devices require mobile accessibility settings to be turned on. Please follow those instructions as laid out by the manufacturers.

5.3 Navigating with audio only

VotingApp Mobile Application supports navigating the application and your ballot using only audio prompts. To do this you will first need to attach a third-party hardware device, as described above, and make sure that is working properly. Then navigate within the application to the Language Settings and turn on the audio as described in Section 4.3 Language Settings. Next go to the Accessibility settings as described in Section 4.2 Accessibility Settings and toggle on the Blackout Screen option. From this point on, the application can be navigated solely from audio prompts with the navigation hardware attached. Note, the first pass of external device navigation with a hardware device will start at the menu bar and move down the page element by element; however, each subsequent page will start on the header of the page skipping the top menu bar, and will cycle from that point forward making the menu bar the last option navigation reaches. You can also cycle backwards from the header to reach the menu bar directly.

To reset simply go to the Accessibility settings as described in Section 4.2 Accessibility Settings and either turn off the blackout screen option or use the global reset settings option button.

See highlighted Blackout and Reset Settings to Default options below.